In this tutorial we’ll be creating a Java application calling code from a native library. We’ll have a Java application called HelloWorld
which will call the function helloFromC
from a shared library named ctest
, using Java Native Interface.
First off, we’ll create a file named HelloWorld.java
to contain the HelloWorld
class.
1 2 3 4 5 6 7 8 9 10 |
|
helloFromC
ctest
(which will need to define this function)Even though we didn’t write any library yet, we can still compile the Java application, because this is a dependency that will be resolved at runtime. So, let’s compile the application:
javac HelloWorld.java
This will generate a HelloWorld.class file containing the application. Running the application will now result in an error, as we expect, because the library is not created yet:
java -cp . HelloWorld
Exception in thread "main" java.lang.UnsatisfiedLinkError: no ctest in java.library.path
at java.lang.ClassLoader.loadLibrary(ClassLoader.java:1754)
at java.lang.Runtime.loadLibrary0(Runtime.java:823)
at java.lang.System.loadLibrary(System.java:1045)
at HelloWorld.(HelloWorld.java:6)
Alright, let’s now start writing the ctest library in C. To do that, we must first generate a header file from the .class file we created earlier. This header file will contain the definition of the function as it must be present in the C file.
javah -cp . HelloWorld
This command will generate a HelloWorld.h
file in the same directory, containing the following code:
1 2 3 4 5 6 7 8 9 10 11 12 13 14 15 16 17 18 19 20 21 |
|
We’ll leave this file exactly as is, as the comment suggests, but we need to copy the function definition. Copy the definition and put it in a new file, named ctest.c:
1 2 3 4 5 6 |
|
Note that we gave names to the parameters. Now let’s implement the function. Aside from our own includes, we also need to include jni.h for this to work. So, modify the ctest.c file to contain something like:
1 2 3 4 5 6 7 8 9 10 |
|
Now that we have the file, let’s compile it and create a native library. This part is system dependent, but the only things that change really are the extension of the generated library file and the path to the jni.h include.
gcc -shared -fpic -I$JAVA_HOME/include -I$JAVA_HOME/include/linux ctest.c -o libctest.so
Replace .so with .dylib if you’re on a Mac, or .dll if you’re on Windows (remove the lib part from the file name as well if you’re on Windows). Also, replace /path/to/jdk/headers with the full path to the directory containing the file jni.h. If you don’t know where that is, you can use the locate jni.h command on UNIX-like systems.
Once you successfully run the above command, you will see a libctest.so file in the current directory (or libctest.dylib or libctest.dll). If you remember from the Java code you wrote earlier, the virtual machine will expect a library named ctest to reside in the current directory (point 2). By that, it means that a file with the name libctest.so should be here, which you just created.
To see this in action, run the application:
java -cp . -Djava.library.path=. HelloWorld
If everything works correctly, you should see:
Hello from C!
If we want to call C++ function, we need to make two changes.
First, rename the file ctest.c
to ctest.cpp
and append extern "C"
to every function that we want to call from Java code.
1 2 3 4 5 6 7 8 9 10 |
|
Second, use g++
instead of gcc
, and link the Standard C++ library by adding the option -lstdc++
to g++.
g++ -shared -fpic -I$JAVA_HOME/include -I$JAVA_HOME/include/linux -lstdc++ ctest.cpp -o libctest.so
To see if it works, run the application:
java -cp . -Djava.library.path=. HelloWorld
If everything works correctly, you should see:
Hello from C++!
Here are the three source code files.
1 2 3 4 5 6 7 8 9 10 11 12 13 14 15 16 17 18 19 20 21 22 23 24 25 26 27 28 29 30 31 32 33 34 35 36 37 38 39 40 41 42 43 44 45 46 47 48 49 50 51 52 53 54 55 56 57 58 59 60 61 62 63 64 65 66 67 68 69 70 71 72 73 74 75 76 77 78 79 80 81 82 83 84 85 86 87 88 89 90 91 92 93 94 95 96 97 98 99 100 101 102 103 104 105 106 107 108 109 110 111 112 113 114 115 116 117 118 119 120 121 122 |
|
1 2 3 4 5 6 7 8 9 10 11 12 13 14 15 16 17 18 19 20 21 22 23 24 25 26 27 28 29 30 31 32 33 34 35 36 37 38 39 40 41 42 43 44 45 46 47 48 49 50 51 52 53 54 55 56 57 58 59 60 61 62 63 64 65 66 67 68 69 70 71 72 73 74 75 76 77 78 79 80 81 82 83 84 85 86 87 88 89 90 91 92 93 94 95 96 97 98 99 100 101 102 103 104 105 106 107 108 109 110 111 112 113 114 115 116 117 |
|
1 2 3 4 5 6 7 8 9 10 11 12 13 14 15 16 17 18 19 20 21 22 23 24 25 26 27 28 29 30 31 32 33 34 35 36 37 38 39 40 41 42 43 44 45 46 47 48 49 50 51 52 53 54 55 56 57 58 59 60 61 62 63 64 65 66 67 68 69 70 71 72 73 74 75 76 77 78 79 80 |
|
Explanations:
StringInputBuffer
class in the MemoryJavaFileManager.java
..class
files in memory, I implemented a class MemoryJavaFileManager
. The main idea is to override the function getJavaFileForOutput()
to store bytecodes into a map.MemoryClassLoader
, which reads bytecodes in the map and turn them into classes.Here is a unite test.
1 2 3 4 5 6 7 8 9 10 11 12 13 14 15 16 17 18 19 20 21 22 23 24 25 |
|
We know that Jackson is very convenient to deserialize a JSON string into a ArrayList
, HashMap
or POJO object.
But how to deserialize a JSON String to a binary tree?
The definition of binary tree node is as follows:
1 2 3 4 5 |
|
The JSON String is as follows:
{
"value": 2,
"left": {
"value": 1,
"left": null,
"right": null
},
"right": {
"value": 10,
"left": {
"value": 5,
"left": null,
"right": null
},
"right": null
}
}
The above JSON string represents a binary tree as the following:
2
/ \
1 10
/
5
The solution is quite simpler, since JSON can express tree naturally, Jackson can deal with recursive tree directly. Just annotate a constructor with JsonCreator
:
1 2 3 4 5 6 7 8 9 10 11 |
|
Let’s write a unite test to try it:
1 2 3 4 5 6 7 8 9 10 11 12 13 14 15 16 17 18 19 20 21 22 23 24 25 26 27 28 29 30 31 32 33 34 35 36 37 38 39 40 41 42 43 44 45 46 47 48 49 50 51 52 53 54 55 56 57 58 59 60 61 62 63 64 65 66 67 68 69 70 71 72 73 74 75 76 77 78 79 |
|
Well, there is a little problem here, the JSON string above is very verbose. Let’s use another kind of serialization format, i.e., serialize a binary tree in level order traversal. For example, the binary tree above can be serialized as the following JSON string:
[2,1,10,null,null,5]
Now how to deserialize this JSON string to a binary tree?
The idea is very similar to my previous article, Deserialize a JSON Array to a Singly Linked List. Just make the BinaryTreeNode
implement java.util.list
, pretend that it’s a list, write our own deserialization code so that Jackson can treat a binary tree as a list.
The complete code of BinaryTreeNode
is as the following:
1 2 3 4 5 6 7 8 9 10 11 12 13 14 15 16 17 18 19 20 21 22 23 24 25 26 27 28 29 30 31 32 33 34 35 36 37 38 39 40 41 42 43 44 45 46 47 48 49 50 51 52 53 54 55 56 57 58 59 60 61 62 63 64 65 66 67 68 69 70 71 72 73 74 75 76 77 78 79 80 81 82 83 84 85 86 87 88 89 90 91 92 93 94 95 96 97 98 99 100 101 102 103 104 105 106 107 108 109 110 111 112 113 114 115 116 117 118 119 120 121 122 123 124 125 126 127 128 129 130 131 132 133 134 135 136 137 138 139 140 141 142 143 144 145 146 147 148 149 150 151 152 153 154 155 156 157 158 159 160 161 162 163 164 165 166 167 168 169 170 171 172 173 174 175 176 177 178 179 180 181 182 183 184 185 186 187 188 189 190 191 192 193 194 195 196 197 198 199 200 201 202 203 204 205 206 207 208 209 210 211 212 213 214 215 216 217 218 219 220 221 222 223 224 225 226 227 228 229 230 231 232 233 234 235 236 237 238 239 240 241 242 243 244 245 246 247 248 249 250 251 252 253 254 255 256 257 258 259 260 261 262 263 264 265 266 267 268 269 270 271 272 273 274 275 276 277 278 279 280 281 282 283 284 285 286 287 288 289 290 291 292 293 294 295 296 297 298 299 300 301 302 303 304 305 306 307 308 309 310 311 312 313 314 315 316 317 318 319 320 |
|
Then comes with the unit tests:
1 2 3 4 5 6 7 8 9 10 11 12 13 14 15 16 17 18 19 20 21 22 23 24 25 26 27 28 29 30 31 32 33 34 35 36 |
|
This article is inspired by Tatu Saloranta from this post, special thanks to him!
ArrayList
, HashMap
or POJO object.
But how to deserialize a JSON array, such as [1,2,3,4,5]
to a singly linked list?
The definition of singly linked list is as follows:
1 2 3 4 5 |
|
Well, the solution is quite simpler than I expected: Just make SinglyLinkedListNode
implement java.util.List
or java.util.Collection
, Jackson will automatically deserialize it!
This idea comes from Tatu Saloranta, the discussion post is here, special thanks to him!
Here is the complete code of SinglyLinkedListNode
:
1 2 3 4 5 6 7 8 9 10 11 12 13 14 15 16 17 18 19 20 21 22 23 24 25 26 27 28 29 30 31 32 33 34 35 36 37 38 39 40 41 42 43 44 45 46 47 48 49 50 51 52 53 54 55 56 57 58 59 60 61 62 63 64 65 66 67 68 69 70 71 72 73 74 75 76 77 78 79 80 81 82 83 84 85 86 87 88 89 90 91 92 93 94 95 96 97 98 99 100 101 102 103 104 105 106 107 108 109 110 111 112 113 114 115 116 117 118 119 120 121 122 123 124 125 126 127 128 129 130 131 132 133 134 135 136 137 138 139 140 141 142 143 144 145 146 147 148 149 150 151 152 153 154 155 156 157 158 159 160 161 162 163 164 165 166 167 168 169 170 171 172 173 174 175 176 177 178 179 180 181 182 183 184 185 186 187 188 189 190 |
|
Then comes with the unit tests:
1 2 3 4 5 6 7 8 9 10 11 12 13 14 15 16 17 18 19 20 21 22 23 24 25 26 27 28 29 30 31 32 33 34 35 36 37 38 39 40 41 42 43 |
|
However, not everyone need to dig into the source code, normally more people will just call the Hadoop APIs to write a MapReduce program. When you write a MapReduce program, you rarely get it right for one time, then you need to debug your code.
This time I’ll show you how to debug your Hadoop applications using the IntelliJ IDE.
Environment: CentOS 6.6, Oracle JDK 1.7.0_75, Maven 3.2.5, IntelliJ Idea 14.0.3
First we need to create a MapReduce program to debug. Let’s use the simplest example, WordCount, for demonstration. The source code is here WordCount – Hadoop Wiki.
Use the mvn
command to generate the scaffolding for the project.
mvn archetype:generate -DgroupId=me.soulmachine -DartifactId=wordcount -DarchetypeArtifactId=maven-archetype-quickstart -DinteractiveMode=false
Delete the src/test/java/me/soulmachine/AppTest.java
file, as it will not be used in this example, and rename the src/main/java/me/soulmachine/App.java
file to WordCount.java
.
Now the structure of the project is as the following:
tree ./wordcount
wordcount/
├── pom.xml
└── src
├── main
│ └── java
│ └── me
│ └── soulmachine
│ └── WordCount.java
└── test
└── java
└── me
└── soulmachine
Rename the src/main/java/me/soulmachine/App.java
file to WordCount.java
, edit the file and copy and paste the code from WordCount – Hadoop Wiki, remember to change the first line from package org.myorg
to package me.soulmachine
.
I made some improvements to this code, check it out:
The content of the pom.xml
file is as the following:
<project xmlns="http://maven.apache.org/POM/4.0.0" xmlns:xsi="http://www.w3.org/2001/XMLSchema-instance"
xsi:schemaLocation="http://maven.apache.org/POM/4.0.0 http://maven.apache.org/maven-v4_0_0.xsd">
<modelVersion>4.0.0</modelVersion>
<groupId>me.soulmachine</groupId>
<artifactId>wordcount</artifactId>
<packaging>jar</packaging>
<version>1.0-SNAPSHOT</version>
<name>wordcount</name>
<url>http://maven.apache.org</url>
<properties>
<project.build.sourceEncoding>UTF-8</project.build.sourceEncoding>
<hadoop.version>2.6.0</hadoop.version>
</properties>
<dependencies>
<dependency>
<groupId>org.apache.hadoop</groupId>
<artifactId>hadoop-client</artifactId>
<version>${hadoop.version}</version>
</dependency>
</dependencies>
<build>
<plugins>
<plugin>
<groupId>org.apache.maven.plugins</groupId>
<artifactId>maven-jar-plugin</artifactId>
<configuration>
<archive>
<manifest>
<mainClass>me.soulmachine.WordCount</mainClass>
</manifest>
</archive>
</configuration>
</plugin>
</plugins>
</build>
</project>
mvn clean package
If this step succeeds, move to the next step.
Launch IntelliJ Idea, click File->Open
and open the pom.xml
, thus you can import the project into IntelliJ Idea.
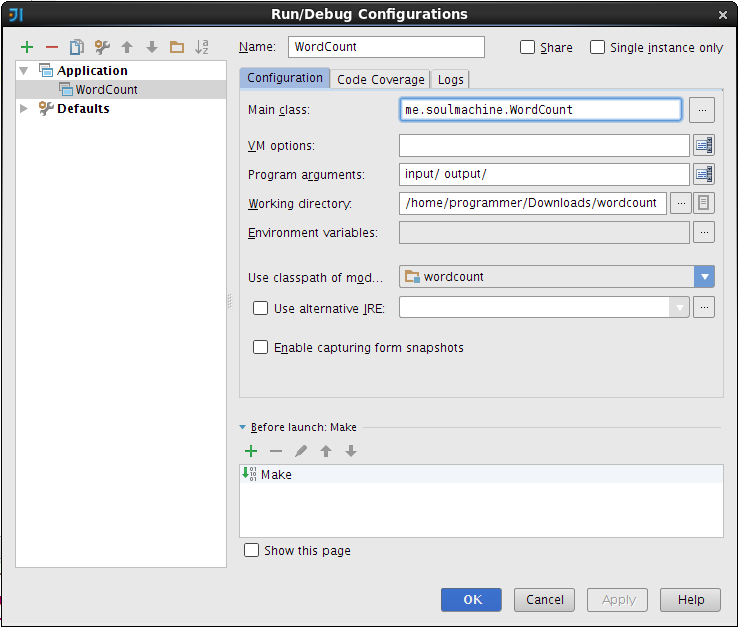
Select the project “WordCount”, Click menu Run->Edit Configurations ...
,
Main Class
and select me.soulmachine.WordCount
as the main class.Program Arguments
to input/ output
, and create a directory named input
in the project directory, no need to create the output/
directoryOK
and finish.file1.txt
in the input/
directory and set its content as Hello World Bye World
, create another text file named file2.txt
and set its content to Hello Hadoop Goodbye Hadoop
.Run->Run 'Word Count'
, after it finishes, you will see a fold named output/
in the project root directory and there are two files named part-r-00000
and _SUCCESS
.Set a break point in the main
function and click menu Run->Debug 'Word Count'
, then you can debug the code step by step.
Environment: CentOS 6.6, Oracle JDK 1.7.0_75
Download jdk-7u75-linux-x64.rpm
sudo yum localinstall -y ./jdk-7u75-linux-x64.rpm
For now if you use JDK 8 to compile the source code of Hadoop, it will fail because the javadoc in Java 8 is considerably more strict than the one in earlier version, see more detailes here
wget http://mirrors.gigenet.com/apache/maven/maven-3/3.2.5/binaries/apache-maven-3.2.5-bin.tar.gz
sudo tar -zxf apache-maven-3.2.5-bin.tar.gz -C /opt
sudo vim /etc/profile
export M2_HOME=/opt/apache-maven-3.2.5
export PATH=$M2_HOME/bin:$PATH
wget http://iweb.dl.sourceforge.net/project/findbugs/findbugs/3.0.0/findbugs-3.0.0.tar.gz
sudo tar -zxf findbugs-3.0.0.tar.gz -C /opt
sudo vim /etc/profile
export FB_HOME=/opt/findbugs-3.0.0
export PATH=$FB_HOME/bin:$PATH
If you want to run mvn compile findbugs:findbugs
then you need to install FindBugs.
sudo yum install -y gcc-c++ cmake autoconf automake
sudo yum -y install gcc-c++ lzo-devel zlib-devel libtool openssl-devel
Optional:
sudo yum install -y snappy-devel
sudo yum install -y svn
During the process of compilation, it will throw out some warning messages if there is no svn
command.
wget https://protobuf.googlecode.com/files/protobuf-2.5.0.tar.gz
tar -zxf protobuf-2.5.0.tar.gz
cd protobuf-2.5.0
./configure
make
sudo make install
rm -rf ./protobuf-2.5.0
rm ./protobuf-2.5.0.tar.gz
NOTE: The Protobuf version must be exactly 2.5.0, or the compilation will fail.
git clone git@github.com:apache/hadoop.git
Create binary distribution with native code and without documentation.
mvn clean package -Pdist,native -Dtar -DskipTests -Drequire.snappy -Drequire.openssl
wget http://download-cf.jetbrains.com/idea/ideaIC-14.0.3.tar.gz
sudo tar -zxf ideaIC-14.0.3.tar.gz -C /opt
Launch IntelliJ Idea, Create Desktop Entry
First you need to run
mvn install -DskipTests
Since some submodules of Hadoop depend on other submodules, so you need to run mvn install -DskipTests
to copy jars of Hadoop submodules to local $HOME/.m2
, so that Maven won’t download them from Internet. If you omit this step, Maven will try to download them from public Maven repository and will fail, because the newest version of Hadoop jars are not available in public Maven repository yet.
Then click File->Open
to open the pom.xml
in the root directory of Hadoop repo.
Note: Don’t use mvn idea:idea
to generate IntelliJ Idea projects first , IntelliJ Idea can handle pom.xml quite well, besides, the “Maven IDEA Plugin” has already RETIRED.
There are many classes in Hadoop source code, if your IntelliJ hangs and doesn’t respond from time to time, then you can try to give more memory to IntelliJ Idea by modifying the file idea64.vmoptions
in the installation directory. Example below:
-Xms128m
-Xmx4096m
-XX:MaxPermSize=1024m
In my next blog, I’ll explain how to Debug Hadoop Applications with IntelliJ
]]>CheckStyle is a development tool to help programmers write Java code that adheres to a coding standard. It automates the process of checking Java code to spare humans of this boring (but important) task. This makes it ideal for projects that want to enforce a coding standard.
Which Java code style to choose? Google has published a few coding standards, include Google Java Style. Aditionally, there are xml configuration files for Eclipse and IntelliJ in the SVN repository, https://code.google.com/p/google-styleguide/source/browse/trunk.
Checkstyle Eclipse plugin has already used Google Java style by default, checkt it by clicking “Window->Preferences->Checkstyle->Global Check Configurations”, or at https://github.com/checkstyle/checkstyle/blob/master/google_checks.xml.
To check your coding style automatically in Eclipse, just install the Checkstyle Eclpise plugin. Launch Eclipse, click Menu “Help –> Install New Software”, input http://eclipse-cs.sf.net/update/, then click “Next” to install the plugin.
Add the following lines to pom.xml to enable Checkstyle:
<build>
<plugins>
<plugin>
<groupId>org.apache.maven.plugins</groupId>
<artifactId>maven-checkstyle-plugin</artifactId>
<version>2.13</version>
<dependencies>
<dependency>
<groupId>com.puppycrawl.tools</groupId>
<artifactId>checkstyle</artifactId>
<version>6.1.1</version>
</dependency>
</dependencies>
<executions>
<execution>
<id>checkstyle</id>
<phase>validate</phase>
<configuration>
<configLocation>google_checks.xml</configLocation>
<encoding>UTF-8</encoding>
<consoleOutput>true</consoleOutput>
<failsOnError>true</failsOnError>
<includeTestSourceDirectory>true</includeTestSourceDirectory>
</configuration>
<goals>
<goal>checkstyle</goal>
</goals>
</execution>
</executions>
</plugin>
</plugins>
</build>
<reporting>
<plugins>
<plugin>
<groupId>org.apache.maven.plugins</groupId>
<artifactId>maven-checkstyle-plugin</artifactId>
<version>2.13</version>
<configuration>
<configLocation>https://raw.githubusercontent.com/checkstyle/checkstyle/master/google_checks.xml</configLocation>
</configuration>
</plugin>
<plugin>
<groupId>org.apache.maven.plugins</groupId>
<artifactId>maven-jxr-plugin</artifactId>
<version>2.5</version>
</plugin>
</plugins>
</reporting>
To format source code automatically according to Google Java style, import the file eclipse-java-google-style.xml into Eclipse by clicking menu “Window->Preferences->Java->Code Style->Formatter->Import”.
You can add the code style automatically via Maven, add the following lines to pom.xml:
<plugin>
<groupId>org.apache.maven.plugins</groupId>
<artifactId>maven-eclipse-plugin</artifactId>
<version>2.9</version>
<configuration>
<downloadSources>true</downloadSources>
<downloadJavadocs>true</downloadJavadocs>
<workspace>${basedir}</workspace>
<workspaceCodeStylesURL>https://google-styleguide.googlecode.com/svn/trunk/eclipse-java-google-style.xml</workspaceCodeStylesURL>
</configuration>
</plugin>
Checking code style is not enough, there are many static anaylysis tools which can analyze your code and find potential bugs, for example PMD, findbugs, etc. The difference between them is http://www.sw-engineering-candies.com/blog-1/comparison-of-findbugs-pmd-and-checkstyle.
PMD is a source code analyzer. It finds common programming flaws like unused variables, empty catch blocks, unnecessary object creation, and so forth.
PMD Eclipse plugin update site: http://sourceforge.net/projects/pmd/files/pmd-eclipse/update-site/.
To enable automatically static analysis during compilation, add the following lines to pom.xml:
<build>
<plugin>
<groupId>org.apache.maven.plugins</groupId>
<artifactId>maven-pmd-plugin</artifactId>
<version>3.3</version>
<executions>
<execution>
<phase>validate</phase>
<goals>
<goal>check</goal>
<goal>cpd-check</goal>
</goals>
</execution>
</executions>
</plugin>
</build>
<reporting>
<plugins>
<plugin>
<artifactId>maven-pmd-plugin</artifactId>
<version>3.3</version>
<reportSets>
<reportSet>
<reports>
<report>pmd</report>
<report>cpd</report>
</reports>
</reportSet>
</reportSets>
</plugin>
</plugins>
</reporting>
Eclipse Update Site: http://findbugs.cs.umd.edu/eclipse
Official site: http://mojo.codehaus.org/findbugs-maven-plugin/
To configure your build to fail if any errors are found in the FindBugs report, add the following lines to pom.xml.
<build>
<plugins>
<plugin>
<groupId>org.codehaus.mojo</groupId>
<artifactId>findbugs-maven-plugin</artifactId>
<version>3.0.1-SNAPSHOT</version>
<configuration>
<effort>Max</effort>
<threshold>Low</threshold>
<xmlOutput>true</xmlOutput>
</configuration>
<executions>
<execution>
<goals>
<goal>check</goal>
</goals>
</execution>
</executions>
</plugin>
</plugins>
</build>
Reference: http://mojo.codehaus.org/findbugs-maven-plugin/examples/violationChecking.html
Nowadays there are many tools that are more powerful and automatic, for example, SonarQube, Coverity. SonarQube is an open source quality management platform, dedicated to continuously analyze and measure source code quality, and has been used by many companies, I will try it in the next step.
]]>$ \curl -sSL https://get.rvm.io | bash -s stable --ruby
/etc/profile
, ~/.bash_profile
are for login shell, and ~/.bashrc
is for interactive shell, and RVM’s path is added to ~/.bash_profile
, so you need to set the shell as a login shell.
Exit current shell, and open a new shell,
ruby -v
You have successfully installed ruby.
$ sudo apt-get install -y python
Because Pygments syntax highlighting needs Python.
First you need to clone the source
branch to the local octopress folder.
$ git clone -b source git@github.com:username/username.github.com.git octopress
Then clone the master
branch to the _deploy
subfolder.
$ cd octopress
$ git clone git@github.com:username/username.github.com.git _deploy
Then run the rake installation to configure everything
$ gem install bundler
$ bundle install
NOW you’ve setup with a new local copy of your Octopress blog.
You don’t need to run rake setup_github_pages
any more.
If you want to blog at more than one computer, you need to make sure that you push everything before switching computers. From the first machine do the following whenever you’ve made changes:
$ rake new_post["hello world"]
$ rake generate
$ rake deploy
This will generate your blog, copy the generated files into _deploy/
, add them to git, commit and push them up to the master branch, see Deploying to Github Pages.
Don’t forget to commit the source for your blog.
$ git add .
$ git commit -am "Some comment here."
$ git push origin source # update the remote source branch
$ cd octopress
$ git pull origin source # update the local source branch
$ cd ./_deploy
$ git pull origin master # update the local master branch